Navigation » Dorkiphus.net
»
My new Project 911T
| Porsche Technical Discussions Porsche related technical discussions and questions go here. |
 |
|
|
Thread Tools | Display Modes |
|
|
|
#1
 03-10-2016, 01:08 PM
|
||||
|
||||
|
Very nice! Does this mean your garage is now free to fix the rocker panels on my 1970T?

__________________
-Fritz '93 C2 Cabriolet - That cool Amazon Blue-Green Metallic color '70 911T, sorta - '70 Chasis, '77 shortnose, 3.0L CIS engine, and SC fenders 
|


|
#2
03-10-2016, 09:12 PM
|
||||
|
||||
|
Quote:
Cheers Engelbert
__________________
LED Lights for Classic Porsches 2015 911 Turbo 2012 Boxster S 2006 Cayenne S 1982 911 SC 1978 1303 Kaefer Cabrio 1971 911 3.6
|


|
#3
03-10-2016, 09:11 PM
|
||||
|
||||
|
No, and I'm sorry.
The 1971 AX car is now on the lift. I had to put in a new clutch disc, and fix the front spoiler. I messed it up at Summit Point when I drove it back on the trailer after the autocross. 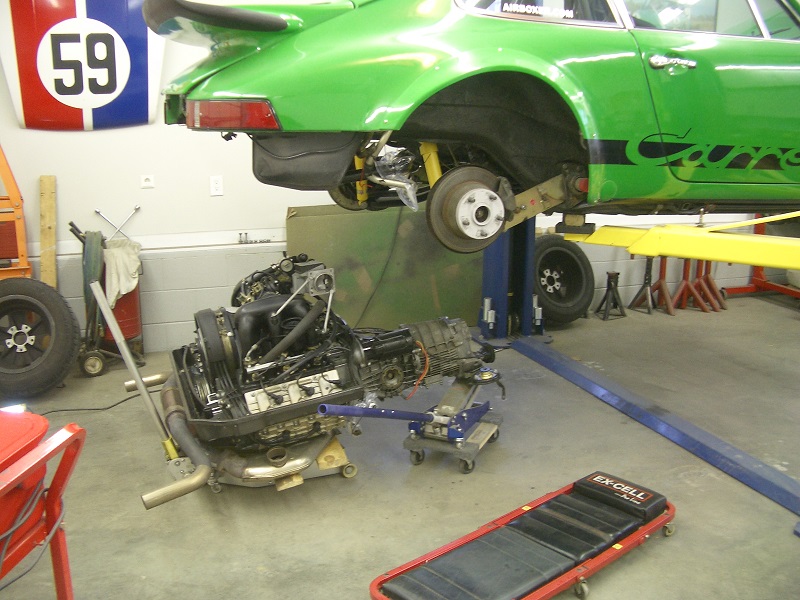 Cheers Engelbert
__________________
LED Lights for Classic Porsches 2015 911 Turbo 2012 Boxster S 2006 Cayenne S 1982 911 SC 1978 1303 Kaefer Cabrio 1971 911 3.6
|
|
#4
05-11-2016, 06:31 PM
|
||||
|
||||
|
I've been so slammed lately trying to get caught up I've kind of neglected a lot of the build threads I should be posting in. Fortunately for me Engelbert lives close enough he swings by every couple weeks to see what is happening. Anyway, here are some pics of the progress for posterity. Car arrived with a coat of brush on etch I sanded off, roughed in the worst areas and started the priming process, then proceeded to blocking it all straight. The only areas that really required any attention was the drivers rear door jamb which was a bit tight and needed some " persuasion " to get the gap a little bigger. Most of the removable panels were already in high build primer ( yellow ) so I just went straight to blocking them. the green ones were an etch primer that got sanded and primed to start blocking straight
__________________
http://www.kahikocustoms.com/auto-projects
|


|
#5
05-11-2016, 06:43 PM
|
||||
|
||||
|
mo
__________________
http://www.kahikocustoms.com/auto-projects
|
|
#6
05-11-2016, 06:47 PM
|
||||
|
||||
|
mo
back half ended up needing some more metal work so it got another coat of high build while the doors forward are now a stage ahead. I got the rest of the rear blocked down today and will have it caught up to the rest of the car tomorrow or Friday
__________________
http://www.kahikocustoms.com/auto-projects
|
|
#7
05-11-2016, 06:48 PM
|
||||
|
||||
|
As of today
__________________
http://www.kahikocustoms.com/auto-projects
|
|
#8
05-11-2016, 06:51 PM
|
||||
|
||||
|
....
__________________
http://www.kahikocustoms.com/auto-projects
|
|
#9
05-11-2016, 07:44 PM
|
||||
|
||||
|
That is an incredible transformation. Simply amazing. Thanks for sharing!
__________________
Martin 2011 Cayman S (Gone) - Hardtop Blechster 2006 Cayman S (DD) 2016 Mazda CX-5 (Her DD) 2002 Boxster S (Gone) - Ragtop Blechster - Pura Patina! Dorkiphus: I buy it for the articles
|

|
#10
06-19-2016, 11:24 PM
|
||||
|
||||
|
got the whole underside prepped for some epoxy and undercoating. Prepped, undercoated and painted the hood and engine lid undersides. Any spots on the underside the undercoating was missing got sanded back until it got to good adhesion and clean metal, then feathered it out so the new undercoating will blend in as fluidly as possible. I In the pics, you will see black paint on the floor and the shots of it not feathering out on the body are why I rant about PO15. I have no doubt Engelbert applied it properly, but I have seen time and time again, if the stuff gets scratched or sanded or chipped, it just starts coming off. We sanded it out to where it would feather then scuffed any that stayed adhered with 180 grit, so the epoxy will adhere to it properly. There were a few surface rust spots, they all got scrubbed and wiped with OSPHO until they rust was all gone and then a final scrub of OSPHO was left to do it's trick for the weekend. I also got the backsides of the bumper and bumperettes ready for epoxy and undercoat but forgot to take pics of them.
__________________
http://www.kahikocustoms.com/auto-projects
|
|
«
Previous Thread
|
Next Thread
»

 Hybrid Mode
|
|
